


This is a re-post from a thread I wrote on the Sony F5/F55 forums under my username alias starcentral
Below is a run down on how to use Davinci Resolve to transcode your XAVC footage from the F5 or F55 camera using Davinci Resolve. This might be useful for anyone looking to create “rushes”, dailies, or low res proxy files from the Sony F5 or F55 cameras. (It seems quite odd to call 1080p low res proxy) 🙂
Note that you can use the FREE version of Davinci Resolve R12.5 to open 2k or 4k files with the only limitation being that it can not output higher than UHD resolution files. You’d need the full paid version of Davinci Resolve to go higher than HD, but this is still a great option for those looking to wrangle out some files from their Sony MXF files.
Note there are some differences in settings you may like to use depending on the purpose of the output files.
IMPORTING AND CRITICAL SETTINGS
- Import your MXF files you want to convert in the MEDIA POOL section of Resolve. (Drag from the file explorer area). Once ALL your clips are down below select ALL OF THEM, right click and review the CLIP SETTINGS. Particularly you want to check that the DATA LEVELS are set to 0-1024 instead of AUTOMATIC. Now if these are really only for purpose of DAILIES you can select 64-940. If you shot slog2, 64-940 can remove a bit of that “slog2” look so directors don’t freak out too much over a “pure” looking slog2 image. If you are GRADING or want to preserve the original slog2 look then definitely chose 0-1024.
- Click on SETTINGS (lower left) and check that your IMAGE SCALING is setup how you want. If you shot in 4k mode and outputting to HD you will end up with a thin black bar at the top and bottom of your video files if you chose “scale entire image to fit”. For going 4k to HD I usually select “scale full frame with crop” so that the image fills the entire frame. Note however this does chop off some pixels from left and right sides.
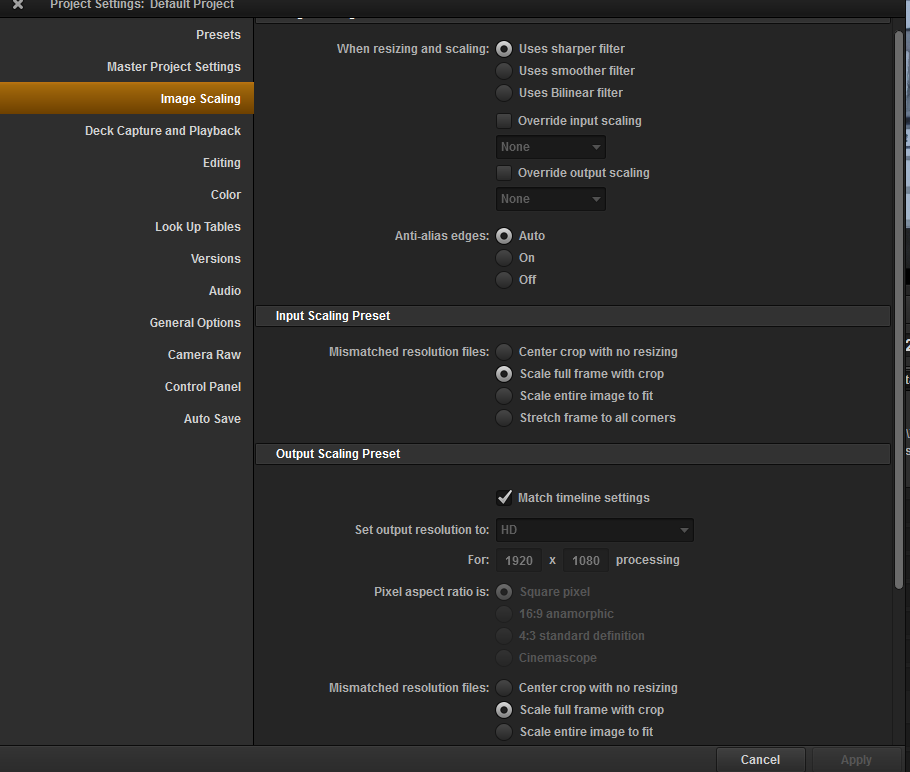
- If you are scaling any footage (ie: 4k to 2k or 4k to HD) under IMAGE SCALING you can select between various filters that will increase/decrease quality or the scale but also increase/decrease rendering times.
- (ONLY APPLICABLE IF YOU HAVE SONY RAW FOOTAGE): Under CAMERA RAW options. If you shot in slog2 + sgamut then select SONY RAW, Decode Quality: Full Resolution, Decode Using: Project, Color Space: sgamut, Gamma:slog2.
OUTPUTING THE FILES
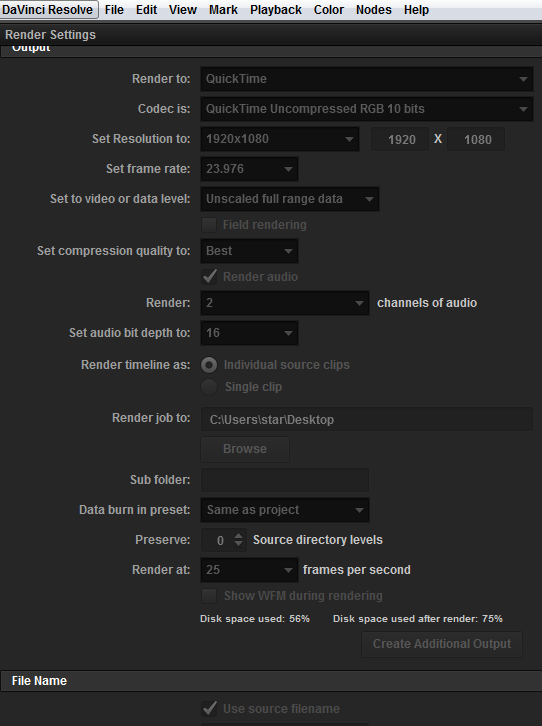
- Once you are ready to output all your clips select the DELIVERY window in RESOLVE.
- This took me 532 hours to figure out… to select ALL the CLIPS for your output go down to the timeline and on the timeline BAR right click and select ALL CLIPS. Sadly this took me forever to figure out, and I do mean forever.
- Now you need to chose your file output settings. For CODEC you might want Quicktime H.264 or Quicktime MPEG which are pretty good and can play on most PC or MAC computers. Otherwise there are various ProRes and Cineform options as well.
- Note your frame rate setting, compression quality setting, and don’t forget to check the AUDIO box if you want to include SOUND in your output files.
- IMPORTANT one here: Under “SET TO VIDEO OR DATA LEVEL” you want to select “Normally scaled legal video” if you want 64-940 data levels, or “Uncaled full range data” for 0-1024 levels.
- If you want all your clips as SEPARATE video files there is a check box for INDIVIDUAL SOURCE CLIPS by the RENDER TIMELINE AS option. For dailies maybe you want one continous file, but I usually keep all of them separate so they can be easily referenced by unique filename if needed.
- Select WHERE you want the files to save to. If you don’t pick this you can not start the job.
- There is a checkbox to keep the original source filename. I recommend this option again so clips can be referenced back to the originals if needed. Also keeping the same file names has benefits if you plan to do any round trip editing wiith 3rd party software and back into Resolve for grading, etc..
- Once you are done setting up your output job, select ADD JOB.
- Once you are ready, START the job and wait several minutes to hours to days depending on how many clips you have and how long they are (and how powerful your computer is).


Thank you very much for this tutorial. I have an issue however, after opening the library and clicking on any file Da Vinci Resolve Crashes every time. I have no idea what might be the reason for this. Any thoughts? Thank you so much
I have been running Davinci since version 9.x and up on both Mac and PC and initially had some issues getting it to run on the Mac surprisingly. The folks at BlackMagic were very helpful in resolving the issue, in my case I had to update a level on my OSX version and today am running OSX 10.8.2.
I do not understand how to import the card into Davinci, I’m confused and frustrated.
Hi Justin. Before you can import any footage files, first you have to make sure that your computer drives are mapped in Davinci under Preferences. Once you have access to your drives you can drag the clips to your media pool.
This video is pretty good at showing how to do it: http://www.youtube.com/watch?v=wry5lJLbk_Q
Where is the timeline BAR?
On the delivery page the timeline bar is located along the bottom of the screen. When you are working on exporting a clip you can if you wish right click along a specific clip and set an “in” and “out” point incase you want to export only a portion of the clip. Hope this helps.
Hi, When I transcode, following this steps, I select all the clips but when i open the folder have only 2 clip. Can you help me? Thanks !
Rafael.
Hello and thank you for checking out my blog. First make sure on the DELIVER page under RENDER SETTINGS you have checked “Individual source clips”. If this is ok then the problem is definitely on your timeline. To fix this right click on the timeline and “select all” or alternatively go to the first clip, right click and select “mark in” and then scroll all the way to the end of your timeline and right click and select “mark out”.
This should do the trick!
Thank you for this, it worked exactly as I hoped with MXF’s from an F5! If you’re using Resolve 11, some of the options for changing data values and rendering individual clips are in different places, but with enough digging it’s easy to find what you need in each menu.
This is a good tutorial for batch exporting clips from Resolve when using it to transcode RAW footage (other than XAVC) as well.
All the best!
Thank you sooooo much for posting this information. Thank you thank thank you.
I feel certain it will work on my A7S XAVC S files.
Yes the A7S shoots XAVC and it is supported by Davinci Resolve indeed! Cheers and thanks for stopping by.
to make your Sony Alpha a7S XAVC-S work well in Davinci Resolve, it’s highly recommended converting a7S XAVC-S clips to DNxHD.mov for Davinci Resolve editing use.
Great tip, and thanks for sharing it here!
You are a life saver! Thank you SO much! 😉
“You’d need the full paid version of Davinci Resolve to go higher than HD, but this is still a great option for those looking to wrangle out some files from their Sony MXF files.” Not so. The Free version (R12.5) allows Exports at upto UHD but not DCI 4K
Thanks for visiting my blog and taking the time to reply. This old post was written at a time around a time when the free version of DaVinci was limited to HD output only, but I have gone ahead and updated the post as to not cause any confusion for future readers. Thanks for pointing it out! Cheers
To convert XAVC or XAVC S without video quality loss, it is better to choose Avdshare Video Converter which is the best XAVC/XAVC S Video Converter for Mac and Windows.
Hi Dave, never heard of that one but thanks for sharing – it’s always good to have multiple options https://www.avdshare.com/video-converter-mac-windows